Description
✨ DIY Luxe Counters in a Weekend — Because Your Kitchen Deserves the Spotlight!
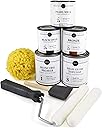
- COMPLETE DIY TOOLKIT - Includes primer, minerals, glitter topcoat, rollers, sponges, and brushes—everything you need to start immediately.
- COVERAGE THAT COUNTS - Covers up to 35 sq ft, perfect for kitchen islands or bathroom counters without breaking the bank.
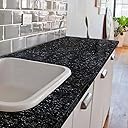
- WEEKEND GRANITE GLOW UP - Transform your countertops to natural granite look in just one weekend with a simple 3-step process.
- DURABLE WASHABLE FINISH - Water-resistant acrylic paint with a glossy finish that stands up to everyday use and easy cleaning.
- MADE IN THE USA WITH SUPPORT - Backed by live chat support and design advice to ensure your project is flawless and stress-free.
The Giani Countertop Paint Kit in Bombay Black offers a budget-friendly, all-inclusive solution to upgrade your countertops with a natural granite look. Featuring a 3-step acrylic paint system with primer, mineral colors, and a glitter topcoat, it covers up to 35 sq ft and cures in 16 hours. Designed for indoor use on various surfaces like laminate, tile, and granite, this washable, water-resistant kit includes all necessary tools and is proudly made in the USA with expert support available.